|
|
|
Using Zoom Commander's integrated schedule editor, media and web content is scheduled for presentation on a remote screen at a specified time & date with optional priority and function.

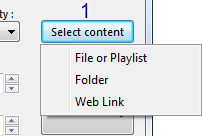 Click the 'Select content' button and choose the type of content to present. Click the 'Select content' button and choose the type of content to present.
- Optionally, select a playback priority (see below).
- Choose a Date & Time for scheduled playback to start and end.
- Optionally, select a 'Start' and/or 'End' function to execute when the scheduled event starts and ends.
- Click the 'Add a new schedule entry' button.
|
-
File or Playlist
Present a media file or playlist.
- Folder
Present the contents of a remote folder.
The specified folder is scanned after each media file completes playback and the next media file in the folder is played automatically in alphabetical order.
When a folder is empty, Zoom Presenter repeatedly scans the folder looking for new media content. As soon as new media content is moved into the folder,
Zoom Presenter detects the new media content and playback resumes.
New media content in the folder can be added and old media content removed in real time without requiring any additional action in Zoom Commander.
Warning!
Do not copy media files into an actively playing folder, move the media files instead.
Moving files from the same drive, or using a cloud synchronization service ensures
the complete media file is instantly available within the folder rather than a partial file in the process of copying. Zoom Presenter may try playing a partial file
currently being copied into the actively playing folder and either play it partially or possibly trigger a crash in one of the audio/video decoding components.
While Zoom Presenter uses mitigating technology to prevent such cases, it is best practice to move new media files from a folder on the same drive as the actively
playing folder.
- Web Link
Present a web page link, for example "inmatrix.com".
|
Updating a Schedule Entry
| | |
To update a scheduled entry, double click a list entry or select an entry and click the 'Import selected entry into editor' button.
Update the entry and apply the update by clicking the 'Update selected entry' button.
|
Assigning Functions to a Schedule Entry
| | |
Beyond setting a time & date for media to play, a schedule entry can apply a Standard
or Extended function at the specified start and end time.
- Standard Functions
Standard functions perform a specific action that does not require additional information, such as Play or Pause.
- Extended Functions
Extended functions require a parameter which the function uses.
For example, seeking to a specific position in the playing media or setting the audio volume level.
|
Setting Priorities for Scheduled Entries
| | |
The priority system is used to break into an existing scheduled playback with higher priority content.
When two schedule entries have overlapping start or end times, the highest priority entry always takes precedence.
Sample uses:
- Create an 'always on' priority zero schedule entry that runs long periods and use 1-10 priority entry values to schedule alternating content, ensuring 24/7 playback.
- Override current scheduled playback to display a breaking news item and then return to the original content automatically, even resume playback from the previous media position (requires 'play history' setting enabled in Zoom Presenter).
Warning!
Do not create schedule entries with overlapping times at the same priority level!
|
Schedule Entry Color Legend
| | |
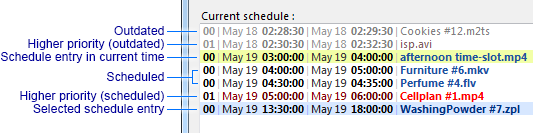 The screenshot on the right illustrates the colors used to indicate a schedule entry's status.
|
If no schedule entry is active, playback will either pause or resume according to the 'Pause at end of scheduled playback' setting in the selected screen's properties page accessible through the 'Edit screen' button.
| |